nuovi file di testo aggiunti alla libreria
July 19th, 2009
Comments off
Categories: beat making, varie
LA FANTASIA ••••••• Gruffetti (rap & scratch), Y (beat) – estratto da "IL
BISBETICO DOPATO•BD3" usb pendrive 2gb………..INFO @
WWW.MYSPACE.COM/DJIPSILON
http://www.youtube.com/watch?v=1JOy3V9uOAI
fonte: http://www.textfiles.com/music/samplers.txt
(The following article is reprinted with permission of the
publishers from the December 1986 issue of Electronic Musician
magazine. For more information on Electronic Musician, or for on-
line subscriptions, check out the "magazines" area of PAN's Synth
& MIDI section.)
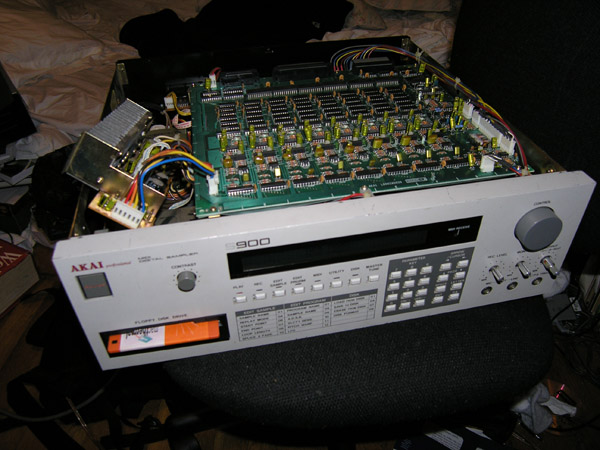
Getting the Most out of the Akai S900
BY STEVEN COX
The arrival of affordable samplers has opened up previously
unavailable sound textures to musicians, and Akai's recent
offering--the S900 Professional MIDI Digital Sampler--is a cost-
effective rack-mount expander module (retail $2999.95) for the
musician who wants to jump on the sampling bandwagon without
blowing the budget.
The S900 is a beautifully designed machine; its level of
sophistication demands spending a little time in study and
experimentation in order to get the most out of your investment.
Good habits, in the form of proper computer and recording
procedures, will make it easier to develop a library of samples
that are as personal as your own fingerprints.
This article assumes you already own an S900 and have started to
understand its possibilities via the operations guide disk and
practical examples in the manual. However, those who don't own
S900s can nonetheless apply some of these tips to any sampler. If
you are already familiar with personal computers in general, so
much the better; to a certain extent, all computers are similar
in concept and design. The S900 is simply a *dedicated computer*
designed to perform the task of digital manipulation of sound
(and related tasking). Like all computers, the S900 has an
*operating system* that ties together all the system elements,
and understanding how this operating system works will give you
maximum control of the instrument.
THE VERSION GAME
After power-up, the S900 dutifully identifies itself and gives
the version number of the operating system ROMs (read only
memory) installed within. When this article was written, 1.2 was
the current version; there's a revised manual to go along with
this version.
If you do not have version 1.2 software, then by all means obtain
it from your dealer. The earlier version, 1.0, is missing some
vital features (such as being able to turn MIDI program changes
on or off). Version 1.2 also displays the audio bandwidth of
existing samples in memory, something you had no way of knowing
before; and when switching from program to program, version 1.2
can sustain one program while switching to another (up to the
limits of the 8 voices). After having to put up with the "klunk"
that many synthesizers make when you change patches, it is
wonderful to hear one program gently fade into (or sustain under)
the next without "glitches."
By far the biggest new feature is the S900's newly acquired
ability to be played from drum machines. The note duration of
most, if not all, drum machines is much too short to allow the
attack, sustain, decay, release (ADSR) curve of the S900's
envelopes to "kick in." The new One Shot Mode, on page 14 of the
edit program section, insures that the sampler will respond to a
trigger of *any* duration by playing the entire length of the
sample (including ADSR, filter, warp, and so on). Thus, the S900
can now be triggered from virtually any MIDI device.
SAMPLING SAFARI (OR, BAGGING THE BIG SOUNDS)
Of all the electronic instruments you will ever play, the sampler
alone offers a grip on reality. It can not only sound like a
string section but in a very real sense it *is* those strings. It
is a near-perfect aural imitator and modifier--the ultimate
parrot.
The ability to recognize a good potential sample when you hear it
is a technique that improves rapidly with practice. Take the time
to experiment with gathering new samples; this will teach you
more about the nature and structure of sound as well as expand
your library.
When on a sampling safari, always try to capture more sound
length than you need, then edit later by using the S900's ability
to discard unwanted portions of a sample. It is also a good idea
to *save your memory to disk* before making drastic or
irreversible changes to programs and samples. As you forge ahead
and experiment, you don't want to burn your bridges behind you.
One way to get started is to take samples from existing
recordings. This may not be the most original route, but it
provides excellent training in the art of sampling. While the CD
player is the medium of choice due to both sound quality and ease
of cueing, phonograph records or even high quality cassette tapes
will do almost as well. The libraries of most colleges and large
metropolitan areas carry a selection of classical music CDs and
phonograph records that are available for rental at very modest
fees. (Note: the copyright implications of sampling from existing
recordings are not clear; *EM* does not endorse sampling or
recording any copyrighted material. You should consider the moral
and ethical implications of taking sounds from others' recordings
regardless of whether or not you apply creative input to them.)
When sampling complex sounds such as loud, full orchestral
textures from pre-recorded material, the quality of the playback
medium is not so important. However, delicate textures (such as
light strings, oboes, etc.) almost *require* that the actual
instruments be played directly to the sampler, or sampled from a
CD, due to the inherent noise levels of tape and vinyl.
When it's time to hook your system's stereo output to the S900's
mono line input, adjust your mixer or balance controls for a 3 dB
(or greater) difference between the left and right channels. This
prevents phase cancellation from messing around with your high
end and/or hollowing out the bottom. Also, watch your recording
level very closely. If your meter reaches those six dots at the
far right of the LCD record display, you have introduced digital
distortion into the signal. You may not notice anything amiss at
first; however, if you listen to the sample played an octave or
more below its original frequency, the "garbage" will become
evident.
I've found the best single instruments to sample are those with a
fairly linear and consistent attack and decay envelope. The
amplitude envelope for a flute or piano doesn't have to change
with every note to still sound natural to the ear, even in a
solo. But guitars or saxes exhibit a high degree of fluctuation
in sound, especially in their attack, and they tend to sound much
less natural when played from a sampler--especially when used "up
front" in a mix. It can be amazing how much a perfectly sampled
recording of a sax can sound just like an accordion when you try
to work with it on some ranges of the keyboard. That effect could
be good, but only if you're after an accordion sound! (What works
for me is to record the guitar or sax sound as "straight" as
possible--no pitch bend or vibrato--then add modulation and
pitch-bending with real time controls such as wheels--Ed.)
For great orchestral samples, check the point of climax in a
phrase or section of music. Endings are also excellent places to
find chords and "hits." Besides classical selections, soundtrack
recordings are often ripe with musical textures that sample well
and loop easily. And keep in mind that students of traditional
instruments at nearby colleges and universities are often
available for sampling sessions; sometimes all you need to do is
put a notice on a music department bulletin board. There are no
rules on where to look, only suggestions.
Drums and related percussion samples are everywhere! Beyond the
obvious capability of sampling traditional drum sounds,
practically *anything* can be used percussively if handled
creatively. For example, sampling the sound of a screwdriver
tapping a table with gated reverb produces an incredible
explosive punch. Played an octave or so below the sampled pitch,
the effect sounds huge! Coughs, chair squeaks, firecrackers, door
slams, grunts, animal noises and even laughter can effectively
"dress up" an otherwise routine drum kit. (Incidentally, a gated
reverb effect is simplicity itself: sample the drum sound with
reverb, then truncate the end to suit--Ed.)
With the 11.878 seconds of memory available at its maximum
bandwidth of 16 kHz, the S900 can even be used for simple
manipulation of vocal or instrumental parts within a song. Just
sing or play that difficult phrase into memory and "presto," from
then on you perform the entire phrase at the press of a single
key whenever you need it in the song. Totally acceptable guitar
samples can also be made with the bandwidth narrowed to around 9
or 10 kHz, thus providing over 21 seconds of sampling time.
CONCERNING THE DISK DRIVE AND RELATED COMMANDS
First and foremost, *be very careful!* The S900 (version 1.2) has
no "double checking" to see if you really want to erase that
file, memory, or disk, and that could spell trouble if you push
buttons first and ask questions later. The advantage, of course,
is that veteran samplers can save time by not having to answer
those "Are You Sure?"-type questions. But always think before you
act, since many pages in the S900 put you just one keystroke away
from some form of annihilation.
You *can* avoid most serious mishaps by getting into the practice
of consistently making backup disks of your most treasured
samples, and write-protecting your "keeper" disks. Remember, a
disk never fails until the most important session or performance
of your life--so keep backups handy.
Another S900 disk operation quirk concerns the "return to home"
error response. For example, if an error occurs when trying to
save to a write-protected disk, the machine "locks up," blinks
all its LEDs, and tells you the problem (and its solution) with a
cute little message "OOPS! Disk is write protected. Take it out
and close the switch in the corner." What the LCD *doesn't*
mention is that upon recovering from the error by pressing the
Disk button to unfreeze the machine, you are now in the Load From
Disk option on page 1 (the exact opposite of what you wanted).
Pressing the enter key at this point would cause the unit to
*erase its memory* and attempt to load from the disk, thus
throwing your hard work from memory into data oblivion! Always
check that you have selected the right function before attempting
to re-save.
Also note that in version 1.2, the S900 does not verify data
after writing to the disk. If by chance you do save to a
defective disk, you have no way of knowing that until you try
unsuccessfully to load it back into memory at some later time.
Hopefully, a verify feature will be available as a later upgrade
(hint, hint), but meanwhile, once again the solution is to make a
backup any time you dump memory to disk. The odds against two bad
disks in a row are pretty great, unless you spilled coke on them
or something equally as devastating!
Speaking of devastating, I recommend that you don't even think
about using Single Sided/Double Density (SS/DD) disks! They mess
up regularly--and when you least expect it--when used in a
double-sided disk drive like the S900. You are not saving money
by buying SS/DD disks, you are buying aggravation and
frustration. Use *only* Double Sided/Double Density disks
(DS/DD).
The S900 allows up to ten characters for program and sample
filenames. Take advantage of this and give your samples
descriptive names; this will make it much easier to locate them
and swap sounds around from disk to disk. Naming the original
sample pitch within the filename (e.g. FLUTE D3, TAH DAH C1,
etc.) can also be a big help, especially when constructing
multiple samples of the same instrument. It makes it much easier
to assign the split points later when working within the program
edit section, and also gives the sample an identity independent
of the program that plays it.
LEARNING FROM THE COMPETITION
Akai was faced with the traditional "cart before the horse"
quandry when they made the big decision to release the S900
*before* developing their own extensive library of sampled
sounds. However, the factory collection already has some
breathtaking selections and it is still growing. Get in touch
with your dealer every now and then, because new factory disks
are expected to be released periodically.
I feel software support is very important. In fact, I attribute
much of the staying power of E-mu's famous Emulator line of
samplers to the vast amount of user-generated samples generated
by the factory, and also by their very active users group. E-mu's
support of their users goes so far as sponsoring sound swap
parties. In my opinion, if the Akai S900 Digital Sampler is to
thrive in today's hyper-competitive "here today and gone
tommorrow" electronic music marketplace, it will need the support
of its own users group actively backed by none other than Akai
itself. Meanwhile, the S900 is quite a machine--especially once
you learn its operating system well enough for it to do your
bidding.
[end of phile]
 immagine da:

http://sp1200.myfastforum.org/..._tips_about5.html
links:
Akai S900 resource page -- http://www.xfader.com/akai/
video how-to:
AKAI S900 VIDEO MAN.zip - 486.69MB -- http://www.zshare.net/download/562917677ccbf54e/
s950 video tutorial -- http://writers-connection.noblogs.org/...eo-manual
Akai S-series samplers website -- http://akai.brothelowner.com/jules/
La sanzione in base all’ordinanza anti-graffiti
Scrivono sui muri di San Lorenzo
Ragazzini multati per 450 euro
Un 17enne e una 14enne sorpresi da agenti del Nucleo Decoro Urbano mentre scarabocchiavano a pennarello
MILANO – Due writer minorenni, un ragazzo e una ragazza rispettivamente di 17 e 14 anni, sono stati sorpresi dagli agenti del Nucleo Decoro Urbano, in servizio in abiti civili, a imbrattare con scritte e disegni un muro posteriore della basilica di San Lorenzo che dà sul Parco delle Basiliche. I due, che sono italiani e non risiedono a Milano, hanno utilizzato grossi pennarelli indelebili. Sono stati denunciati in base all’articolo 639 del codice penale e sanzionati amministrativamente, secondo l’ordinanza vigente, con una multa di 450 euro.
IL VICESINDACO – De Corato, commentando la vicenda, ha parlato di «un atto stupido e incivile, doppiamente da censurare visto che si accanisce ancora una volta contro un monumento simbolo della Milano romana e paleocristiana. Il che rende sempre più necessario fermare questo scempio prevedendo per quel luogo forme più restrittive di tutela, come richieste dallo stesso parroco don Augusto Casolo». De Corato ha ricordato il progetto, nato su richiesta di monsignor De Scalzi nel luglio 2005, di costruire una cancellata telescopica interrata di protezione per la Basilica, con un impatto visivo minimo durante il giorno. Il costo sarebbe di un milione e quattrocentomila euro. De Corato segnala anche che da inizio anno sono già 57 le sanzioni da 500 euro anti-imbrattamenti. Se passerà in Senato il DDL sicurezza, si potrà arrivare alla reclusione fino a un anno e a una multa fino a 3000 euro, per chi imbratta monumenti di interesse storico-artistico.
1 luglio 2009
Sabato 4 luglio 2009: dalle 16.00 Graffiti – Writing – dj set
hip hop con Milelemmi e DJ Sec. A seguire apericena e dalle 21.30 concerto
con Don Diegoh + Herper Rigantani + Ekh-ro + Altibassi + DJ Rod + Lapo Raggiro
Al Totem Garden del CSA Nextemerson, via di Bellagio 15 Firenze, zona Castello.

CSA Nextemerson online — http://www.csaexemerson.it/
La notte scorsa è scomparso uno dei più grandi protagonisti della pop music degli ultimi 40 anni: Michael Jackson. Le cause della morte non sono ancora certe; l’autopsia verrà eseguita in giornata. Voglio ricordare questa grandissima stella dello spettacolo con uno dei suoi videoclip più belli: "Thriller" diretto da John Landis.
Riposa In Pace.
link:
Michael Jackson video tribute by Peanut Butter Wolf — http://www.stonesthrow.com/news/2009/06/pbw-mj-video-tribute
Michael Jackson Looper — http://www.autistici.org/2000-maniax/looper/MJ%20Looper%20-%201958-2009.exe
THX studio equipment

(click to enlarge)
L to R (up): Akai MPD24 usb/midi controller, M-audio Studiophile BX5a monitors (2), E-mu SP 1200 drumachine/sampler (1994 reissue model 7030 with analog filters chip SSM2044), Akai s950 sampler (1988), Toshiba laptop PC Satellite (XP os), M-audio Uno usb/midi interface. L to R (down) Technics SL-1210 MKII turntables (2), Vestax Samurai PMC-05 pro D professional mixing controller, KORG microKORG analog modeling synth/vocoder.
This informations works not only for the SP 1200 sampler but also for all the
other samplers: replace "SP-1200" with the name of your favorite sampler.
your friendly neighborhood… THX
source: SP 1200 user manual; appendix A – fonte: manuale utente della drumachine E-mu SP 1200 (pp.67 e seguenti)
[…]
APPENDIX A: THE ART OF SAMPLING
Recording good samples is not always easy; creating a really super set of sounds requires patience, practice, and skill. Sure, you can get musically useful results within a few days after working with the SP-1200, but as you learn your craft the quality of your samples will improve dramatically.
Sampling involves two major processes:
1. Taking the best possible sample.
2. Manipulating the sample within the SP-1200 (truncating and looping).
PART 1: TAKING THE BEST POSSIBLE SAMPLE
What comes out of the SP-1200 can only be as good as what you put in. Strive for maximum fidelity when sampling. Here are some ways to increase sample quality.
GENERAL TIPS
• Live sampling: Sample “live” whenever possible, rather than recording a sound on tape then sampling from the tape.
• Beware of overloads: The SP-1200 is a digital recording device. Unlike analog recording devices, distortion does not increase slowly past a certain level; rather, it increases rapidly above the overload point, and produces a “non-musical”, splattering type of distortion. Monitor your levels carefully.
• Sampling direct vs. sampling via microphone: Whenever possible, sample electronic instruments directly into the SP-1200. Avoid using a recording console, direct box, or other device in between the instrument and SP-1200.
• Maintain the instrument to be sampled: Tune your instrument if applicable, and check that the instrument doesn’t have any loose parts that rattle, squeak, or make other noises.
• Sampling acoustic instruments: Choose the microphone and mic placement as carefully as you would for any recording project. Musicians sometimes note how hard it is to get a good “sound” in the studio, but that’s what sampling is all about…getting a good sound, and once you’ve got that sound, keeping it.
• Play naturally: Sometimes it’s a lot harder to play one note than several hundred. Unless you’re trying for a special effect, play the sample as you would normally play the instrument. It’s often a good idea to play several notes, and use truncation to zero in on the best of the bunch.
• Avoid ground loops: Ground loops occur when electricity can take two different paths to ground. If there is a resistance difference between the two paths, this can generate a signal (consisting mostly of digital “hash”) that can work its way into the recording chain. With all the instruments patched in place and connected to each other, turn off the SP-1200 and insert a ground lift adapter between the SP-1200 plug and the wall. CAUTION: Removing the ground connection defeats the safety advantage of using a three-wire plug. Make sure the SP-1200 chassis has some other path to ground (usually via the audio input and output cables). Having two paths to ground can cause ground loops, but having no paths to ground can cause a potential shock hazard if there’s an equipment malfunction in the studio.
WARNING: E-MU cannot be responsible for the use of ground lifters in improperly or inadequately wired environments.
• Using signal processing while recording: Just as with regular recording, there are no absolutes about recording signals with or without signal processing. Some engineers feel that tracks should always be recorded flat to allow for the maximum number of options during mixdown; others prefer to record with a bit of processing, especially if the processor might be needed on another track when mixing.
Here are some thoughts about the use of various types of signal processors when recording samples.
• External Preamp: If you need to preamplify the signal being sampled, set the Sample section GAIN SET to 00 dB and use an external, high-quality preamp to increase the signal level going into the SP-1200. The SP-1200 preamp noise level, while acceptable, is sometimes not as quiet as an external mic preamp.
• Limiting Dynamic Range: Limiting the signal being sampled can put a higher average signal level into the SP-1200, thus improving the already excellent signal-tonoise ratio. Also, the limit point can be set just under the SP-1200 overload point, which makes level setting less critical.
• Equalization: If using EQ gives a better instrument sound, then use it. You want the best possible sound going into the SP-1200, so if a little EQ is indicated, it’s usually better to add it while recording rather than having to think about it during playback.
• Compression: Compression can be helpful when looping sounds since it evens out level changes, thus reducing any tendency towards loop “glitching” due to abrupt level changes between the beginning and end points of the loop. If appropriate, use the SP-1200’s decay option to shorten the overall decay time and restore the original signal dynamics.
• Audio “exciters”: To brighten up a sampled signal, use a device such as an Aphex Aural Exciter or EXR Projector. Both of these devices add a high-end “sheen” without adding the stridency encountered with excessive high-frequency equalization.
• Using noise reduction: A number of single-ended noise reduction units (such as the MicMix Dynafex or Rocktron Hush) are now available; these do not require that the noisy signal have been previously encoded, as is the case with Dolby and dbx. If your source signal is noisy, one of these devices can help to greatly clean up the overall sound quality as you sample.
Maintaining sample quality when sampling from tape recordings:
Follow common-sense recording practice — be extremely careful about mic placement, use noise reduction when recording samples on to tape, limit the signal going on to tape rather than limiting the signal coming off the tape into the SP-1200, and add aural enhancement if desired.
Sampling from Compact Discs: This is a great way to get high quality drum sounds, especially with so many records having solo drum intros and breaks.
Creative use of multi-tracking: Try multi-tracking sounds on a conventional recorder, then sampling the combination sound into the SP-1200. For example, combining electronic and acoustic percussion sounds can produce some very useful results.
PART 2: MANIPULATING THE SAMPLE
Proper use of truncation and looping can conserve memory and create novel effects; let’s show how it’s done with an example. Suppose you want to sample a long, sustaining sound such as a gong. Although this will eat up a fair amount of memory, here are some suggestions.
• Compress the gong sound when sampling to even out level variations. This will help create the smoothest looping effect.
• Set a loop after the initial attack of the gong, and loop as short a section of the sound as possible to conserve memory (see Fig. Appendix-1).
• Truncate that portion of the sound after the loop end point.
• With looping, the sound will have infinite sustain. For a more realistic effect, use SET-UP function 18 (DECAY/TUNE SELECT) to set the gong for decay. Use the slider to set an appropriate decay time. Looping can also provide echo and DDL effects. Loop a complete sound so that it continually repeats. Then, use SET-UP function 18 to set a decay time; the repeats will fade out over the decay time. The effect is very similar to echo.
[…]